This blog is used as a memory dump of random thoughts and interesting facts about different things in the world of IT. If anyone finds it useful, the author will be just happy! :-)

Showing posts with label bootstrapper. Show all posts

Thursday, February 24, 2011

Moving to dotNetInstaller: the odd Basic UI

In the previous post, I’ve outlined how to emulate the launch conditions behavior in dotNetInstaller. In that article I have also emphasized the importance of turning the UI into the Basic mode. It is necessary in order to avoid extra dialogs which require user interaction. If you followed the scenario I described, you might notice a strange behavior of the BasicUI mode: the message boxes disappear without any user participation. I thought it’s be a kind of a bug, but it was done on purpose. Take a look at this code (taken from dotNetInstaller sources):

int DniMessageBox::Show(const std::wstring& p_lpszText, UINT p_nType /*=MB_OK*/, UINT p_nDefaultResult /*=MB_OK*/, UINT p_nIDHelp /*=0*/)
{
int result = p_nDefaultResult;
switch(InstallUILevelSetting::Instance->GetUILevel())
{
// basic UI, dialogs appear and disappea
case InstallUILevelBasic:
{
g_hHook = SetWindowsHookEx(WH_CBT, CBTProc, NULL, GetCurrentThreadId());
CHECK_WIN32_BOOL(NULL != g_hHook, L"Error setting CBT hook");
result = AfxMessageBox(p_lpszText.c_str(), p_nType, p_nIDHelp);
CHECK_BOOL(0 != result, L"Not enough memory to display the message box.");
if (result == 0xFFFFFF) result = p_nDefaultResult;
}
break;

// silent, no UI
case InstallUILevelSilent:
result = p_nDefaultResult;
break;

// full UI
case InstallUILevelFull:
default:
result = AfxMessageBox(p_lpszText.c_str(), p_nType, p_nIDHelp);
break;
}

return result;
}

So, as you can see, in Basic mode is shows the message box, and after some time (if you didn’t catch the moment to press any button), it automatically emulates the pressing of default choice button. I was quite surprised when I understood it was designed to work like this – that’s because I’ve never seen such a UI behavior…

But, anyway, I suspect that a user would like to know why the installation terminated - a certain prerequisite is not installed. As long as the mentioned behavior is hard-coded, the only option is to create a custom build of dotNetInstaller. It’s obvious that the fix is trivial here – make the case for InstallUILevelBasic go the same branch as InstallUILevelFull, that is, just show the message box. Next step is to build the solution – see “Contributing to Source Code” chapter of dotNetInstaller.chm for instructions how to build.

Finally, install the custom build instead of the official one and make sure your setup project picks the changes up. That’s it!

As usual, I would appreciate any comments and notes!


Friday, February 18, 2011

Moving to dotNetInstaller: launch conditions

In the previous post I’ve described how to implement the simplest use case of a bootstrapper: create a single EXE file and run the actual installation after extraction. Today I’d like to go further and illustrate more production-like situation.

Ok, imagine that you’d like to add some checks to your installation package, and run the actual installation only if all those checks pass. This scenario has its own term: adding launch conditions. Launch condition is basically a statement which evaluates to either true, or false. In case it’s false, and the check is critical for the further installation, you terminate the installation process, as a rule. Otherwise, you let it do the job.

The dotNetInstaller has a conception called Installed Checks. It can check various areas, like system registry, files or directories. It is only allowed to place installed checks under components. In the simplest scenario we avoided using components, relying just on the install complete command. Components refer to separate independent parts of your installation package. There are various types of components – dotNetInstaller help file explains them all pretty good. So, my first guess was to add a single component of type “exe”, move my embedded files there and add a number of installed checks to it for various prerequisites I require. Something like this:

DNI_prerequisite_wrong

But my assumption was not correct. The trick is that installed check (or a combination of those) placed under a component defines if this very component is installed. In other words, the most “supported” use case of dotNetInstaller is when you add all the components you need into your final package, and each of them verifies its own presence on the target machine. As a result of such verification, a component decides whether to install or not.

A quick search on codeplex.com discussions gave me a link to the appropriate feature request, which proved my assumption it’s not supported out of the box today. However, there is a workaround.

For each of the launch conditions a separate component should be declared. The trick is such components won’t actually install anything, so we’ll call them “fake” components. A component has a property called “failed_exec_command_continue”. It contains a message to be shown to the user in case a component failed to install, so put the appropriate message there, for instance, “.NET 3.5 SP1 is not installed. The installation program will terminate”. Make sure that both “allow_continue_on_error” and “default_continue_on_error” are set to False – otherwise a user will be presented with a prompt box, instead of a simple message box. Finally, put non-existing executable to the “executable” property, e.g. “fake.exe”. Now it’s time to add a required number and combination of installed checks to this fake component, which will actually do the job. Here’s what we get at the end of this shaman dancing:

DNI_prerequisite_right

So, how does this work? The dotNetInstaller starts the installation from the .NET (3.5 SP1) component and the first thing it evaluates the installed checks. If the evaluation succeeds, in our sample this means that the .NET 3.5 SP1 is present on the target machine. In terms of dotNetInstaller, this means that a component we called “.NET (3.5 SP1)” is installed and we do not trigger its installation. Otherwise, if the evaluation fails, this means that the component is not present and dotNetInstaller starts its installation. It will try to call “fake.exe”, which does not exist, and will show a message. As long as we forbad the rest of the installation to continue, it will terminate. Exactly what we need!

Note however, that the described behavior looks that good in Basic UI mode. The error of failed component is just logged to the log file, and no more annoying dialogs are displayed.

If you try this out, you’ll notice one strange little thing with message boxes. In the next blog post I’ll tell you what it is, and how to handle it. And this will be the end of the trilogy. :-)

Thursday, January 27, 2011

Moving to dotNetInstaller: the simplest case

I’ve been playing with one of the most popular bootstrapper applications available as free and open source tool – dotNetInstaller. On one hand, it turns out to be quite a powerful and feature-rich tool. But on the other, some things seem not intuitive to me, and there are still limitations. This post opens the series of (at least, two) posts about dotNetInstaller and my own experience with it.

Ok, imagine you need to do a very simple thing: wrap your installation program resources into a single EXE file, let it extract necessary files to somewhere under %TEMP%, run the installation UI wizard and finally drop extracted files when the installation is done.

You should start by installing dotNetInstaller (I used the most recent 2.0 version). One of the executables being installed is InstallerEditor.exe. It is a kind of IDE (smart editor) for dotNetInstaller project files, which are called configurations. The information about your project is stored as XML, that is easily DIFF-able and MERGE-able.

So, run InstallerEditor, and select File > New – the new empty config file will be created. The first thing I suggest to do is to enable logging – it is a property of config file you’ve just created. Next, right click the root (and so far the only) node in the left pane, and select Add > Configurations > Setup Configuration. Actually, this is the only type of entities you can add under config file node. Besides, at this level you can set the UI level for your bootstrapper. According to our task definition, ‘basic’ is just enough. By now, you should end up with something like this:

DNI_initial_config

Setup configuration serves as a root for various entities: embedded files, installation components, UI controls, etc. However, our requirements for the simplest scenario doesn’t require most of it. Usually configuration consists of a number of components, but again, we won’t add them for now.

In order to include installation files into our bootstrapper, right-click “install:” node and select Add > Embed > Embed Folder. Now fill the properties for this embedded folder. Fortunately, those are just two – sourcefolderpath and targetfolderpath. Place the value ‘#APPPATH’ to the first one and any value to the second. ‘#APPPATH’ is one of the several variable substitutions offered by dotNetInstaller out-of-the-box and basically means that installation files will be picked either from the current folder, or from the one you specify in the /a switch of the linker. The ‘targetfolderpath’ can logically be left empty, because it sets the name of the subfolder under system temp location to extracts the files to. But it is designed to be required, so feel free to paste anything here, for instance, ‘exe’. Ok, so now we are at this point:

DNI_embed_folder

The installation wizard to run is also among those files we embedded, of course. So, in order to run it after the extraction is done we should fill in the ‘complete_command’ property of the configuration. For this, select “install:” node and find the set of properties prefixed with “complete_command”. As you can see, the configuration entity has lots of properties to configure and is quite flexible. The “complete_command” should store the command line to run on successful installation complete. You can specify different values for each of 3 UI modes: full, basic and silent. Actually, if basic or silent are not specified, it will fall back to just “complete_command”.

Besides, we’d like to show CAB extraction dialog. This is especially useful when the files are large and it takes some time to extract. Set “show_cab_dialog” to ‘true’. Optionally, customize other properties of the CAB extraction dialog, like Caption and Message. So, summarizing these two paragraphs, we now have the following configuration:

DNI_complete_command

Pay attention to “cab_path” property. In this form it basically means: take system %TEMP% location, and create a subfolder in it named as random GUID. This guaranties the uniqueness of the extract target location and you would not probably ever want to change it. Now, this magic location can be referenced as #CABPATH by other properties. For isntance, this is what we have done for “complete_command”. The values says: go to the folder the files were just extracted to, go down to its “exe” subfolder (remember ‘targetfolderpath’?) and run InstallWizard.exe.

And finally, some more details. Make sure “auto_start”, “wait_for_complete_command” and “cab_path_autodelete” are all set to ‘true’. Obviously, this will instruct our bootstrapper to start automatically, and auto delete the extracted files after the complete command completes.

Linking and running

Before building the project, you can run it with dotNetInstaller.exe to see the UI. Just run dotNetInstaller.exe /ConfigFile configuration.xml. But this won’t embed any files. As a result, you’ll be able to check only UI (which is obviously not the point for our case). All settings which rely on embedded files will fail.

Instead, we’ll link the sources into final setup.exe. The following command does the job:

        InstallerLinker.exe /o:setup.exe /t:dotNetInstaller.exe /c:install_config.xml /i:my.ico /a:source /v+

Here, /o: stands for output file name, /t: is a template of EXE file to make like – be sure to always set it to dotNetInstaller.exe, /c: is a path to the configuration file we have been editing all this time, /i: is obviously a path to the icon to use as an application icon for setup.exe, /a: is a path to the installation files to embed, and finally, /v+ turns the verbose logging on. In case there are no errors, you’ll see the following output:
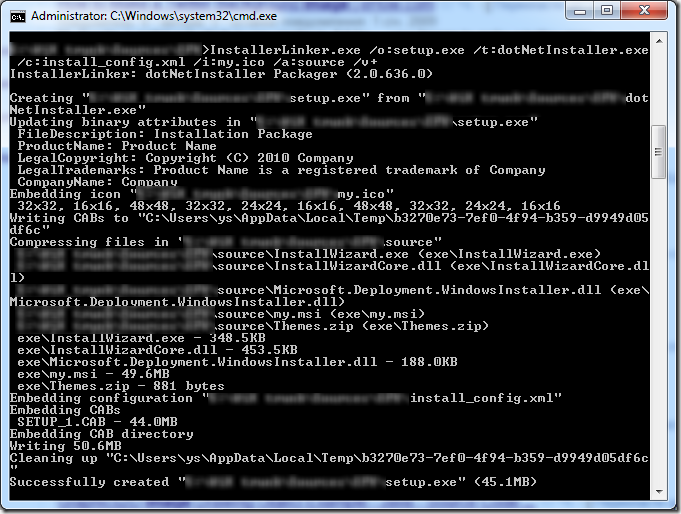
DNI_linker_output

Now you have setup.exe, which extracts your installation files (showing the progress), and starts your main InstallWizard.exe in case of successful extraction.

That’s it! As usual, your comments and notes are welcome.